Chris Padilla/Blog
My passion project! Posts spanning music, art, software, books, and more. Equal parts journal, sketchbook, mixtape, dev diary, and commonplace book.
- The user clicks the "Sign in with Google Button"
- From there, they select their account, sign in, and provider permission to your app.
- An Authorization code is sent back to your app
- The authorization code is then used in another round to get tokens from Google Servers.
- Refresh and access tokens are returned from that server
- These are stored with your application for using the Google API.
- Centralized source of truth for session data.
- Seamless update when user role or permissions change.
- Light on application logic needing to be written on the client.
- Easy management: can clear session in the event of logging out on all devices or a suspended account.
- Limited in a distributed system. All session checks must go through the main site and db.
- Storage costs: db usage scales with active users.
- DB access costs: requires a roundtrip to DB for every request just to verify session.
- A DB breach means this information is compromised.
- Has potential to be a "stateless" login mechanism, allowing for light overhead.
- Lower DB and access cost.
- In a distributed system, so long as you verify the secret, it's possible to verify the user across a cloud infrastructure.
- Added app infrastructure needs to be written to handle token expiration, refreshing, etc.
- Should the token be compromised, extra steps need to be taken to invalidate the user.
- A popular approach is to include user permissions with the token. If that's the case, there needs to be logic written to handle the case where there is an update and the token needs re-encoding
February Blues
Ate too many leftover holiday cookies last month, now I have the blues!
Make it so, Number One

Ground Control to Captain Picard 🪐
Understanding Tokens in OAuth Authentication
Signing in is simple, right? Check credentials from the client and they're good to go.
Not so! Especially when using a third party sign in provider like Google, GitHub, or Facebook.
I've gone through a couple of rounds implementing OAuth sign in. The biggest hurdle when having to handle some of that flow yourself is keeping track of the steps. Here today, I'll break down the how and why:
Sign In Flow
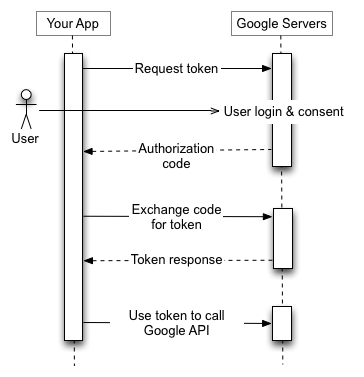
To break down the illustration above:
Largely, if you're using a library like Next Auth or Meteor.js' sign in flow, you may have some of the flow already taken care of. More than likely, though, you'll be managing the refresh and access token yourself when using Google's APIs.
API Integrations
The main benefit of signing in with an external provider is integration with your application. This could be sharing a post to Instagram, saving Spotify Playlists, or sending a generated message through gmail. From the flow above, this is where our tokens come into play.
To do that, you'll likely need to request permissions in the first step above. Google, for example, limits integration by the scopes requested from the app. You user will have to review, for example, read write access Instagram when signing in.
Once approved, the access token is short lived and will grant you access to those specific api actions. Lasting only a few minutes, they are meant for immediate use.
After expiring, the refresh token is used to request a new access token.
The reason for this dance is to mitigate the security challenges of token based authorization while also keeping the main benefit of performance at scale. I wrote a bit about this recently in my review of Database vs JWT authorization strategies.
Essentially: When an access token is given, it's difficult to invalidate it. The token is signed and verified and ready for use. Refresh tokens, however, may have some additional back end logic. A refresh token can be verified, then run through checks to see if the request has any reason to be denied ("sign me out on all devices," suspicious behavior, etc.)
While not being "stateless," this is much easier to scale than a database session. Every instance is stored in a db for that strategy, but only expired refresh tokens are marked in a system that uses a token strategy.
In Practice
At this point, you may be saying "Ok! Show me the code!"
I'll point you to the next auth docs for what this looks like in their system. The library doesn't handle token refreshing, but they've documented what it could possibly look like in your own implementation:
The key thing: check for expiration, then send a request when needed.
if (Date.now() < token.accessTokenExpires) {
    return token
}

// Access token has expired, try to update it
return refreshAccessToken(token)
This check can be done on each session access, though, more than likely, it would be more performant to do this just before the integration funcionality.
Lynes – Sonatina in C
Noodling!
Parker Prom

Going to the Parker Winter Formal with soon-to-be Dr. Schultz 💙
Collocation in React Server Components
At work, we're starting to spin up a Next.js app and are using the new server components! I'll share a quick look at a simple example of what it looks like and why this is a return to form for website building on the web.
A Brief History of Templating
The pendulum of web development needs and trends have swung back and forth between two sides: Heavy lifting on the client, and on the server. When thinking about an application that uses dynamic content (forums, user account sites, wikis), the major glueing that needs to happen is between data and templates. Somewhere, you have to populate a template with the requested data based on the page.
Historically, web servers handled this with templating frameworks. Popular Express templating engines include Pug and Handlebars, in C# the ASP.NET framework uses Razor pages.
A popular design pattern for these types of servers was the Model-View-Controller approach. Essentially, separating file functions based on the roles they played.
When React gained popularity, it was for it's... well, Reactivity. By handling templating on the client, smaller components were able to respond dynamically, eliminating the need for an entire page refresh.
Web performance standards, driven largely by Google's own SEO rankings of pages, have since reigned in the excessive use of client side code for public facing web pages.
And so, the pendulum is swinging back, and the React framework has taken an official stance on how to solve the issue within their own API.
By acting as a templating engine on the server, the amount of js shipped to the client majorly shrinks, allowing for faster page loads with a lighter footprint on the client. All the while, React still structures this in such a way that you can maintain some of the best features of using the JS framework, including component reactivity and page hydration.
Server Components
Examples here will come from Next.js, which at this time is required to have access to this new feature.
By default, all components are marked as server components. A server component for a page may look like this:
import React from 'react';
import db from 'lib/db';
import {getServerSession} from 'next-auth';
import authOptions from '@api/auth/[...nextauth]/authOptions';
import ClientSignIn from './ClientSignIn';

const PageBody = async () => {
    const session = await getServerSession(authOptions);

    return (
        <div className="m-20">
            Hello {session.name}!
            <br />
            <ClientSignIn session={session} />
        </div>
    );
};

export default PageBody;
You can read the functional component linearly as you would a vanilla js function. We're essentially writing a script saying "get the session, await the response, then render my page."
In this simple example is one of the larger paradigm shifts as well as the power of the new feature.
Were I to write this on a client component, I would have to write a useEffect that fetched my session data, I would have to expose an API on my server, write the logic on the server to get the session data, and store the data in my client side state, and then finally render my data. Except, additionally, I would have to manage loading state on the client – showing a skeleton loader or a spinner, and then rending the page when the data has loaded. Phew!
Here, we've skipped several of those steps by directly accessing the database and returning the result in our JSX. If I needed to, I could massage the data within the component as well, work that otherwise would have required a separate API to handle or would need to be done on the client.
Colocation
The main paradigm shift here is colocation in favor of separation of concerns. The first time writing a db query in a React component is a jarring moment! But, colocation is a trend we've seen in motion even with CSS in JS libraries. This furthers it by having all server related code and templating code in one react server component.
For complex apps, this colocation can be a nice DX improvement, with all the relevant business logic not far from the template. All the while, the option for abstraction and decoupling is still available.
Many more thoughts on this, but I'll leave it there for today!
April In Paris
I never knew the charm of spring~ Never met it face to face 🎵
Louie and Ella have my favorite rendition.
Kermit!

Watching the Muppets Show. Never knew that Dizzy Gillespie was a guest star on an episode!
JWTs and Database Sessions from an Architecture Standpoint
This week: A quick look at two session persistence strategies, JWT's and Database storage.
I'm taking a break from the specific implementation details of OAuth login and credentials sign in with Next Auth. Today, a broader, more widely applicable topic.
Remember Me
In the posts linked above, we looked at how to verify a user's identity. Once we've done that, how do we keep them logged in between opening and closing their browser tab?
There are different ways to manage the specifics of these approaches, but I'll be referencing how it's handled in Next Auth since that's where my head has been!
With that in mind, the two that are todays topic are storing authentication status in a JWT or storing session data on the Database.
Database
More conventional in a standalone application, database sessions will sign the user in, store details about their session on the database, and store a session id in a cookie. That cookie is then sent between the server and client for free with every request without any additional logic written by the client or server side code.
Once the user has stored the cookie in their browser, they have the session id for each page request across tabs and windows. With each request, the server will verify the session by looking up the record in the database. Any changes made to the user (permissions, signing out) are handled on the db.
The pros:
The cons:
JWT
The JWT can be implemented in a similar way: Cookies can be used to transport the identifier. However, the difference here is that session data is stored in the Jason Web Token, with no database backing the session. Instead, an encrypted token along with a unique secret with hashing can be used to verify that a token is signed by your application's server.
So, instead of database lookups with a session id, your application's secret is used to verify that this is a token administered by your application.
The pros:
The cons:
Conclusion
The cons for JWT are mostly added architecture, while the cons of the database are storage and db request related. If using a distributed, highly scaled system: JWT's lend several strengths to mitigate the cost of complex systems interacting together as well as a high volume of data. For more stand alone applications, however, perhaps the added overhead of managing a JWT strategy is outweighed by the benefits of a simple DB strategy
PS
I just realized I've written on this exact subject before! D'oh!
In The Gist on Authentication, I wrote about authentication methods from a security standpoint, highlighting best practices to avoid XSRF attacks.
Well, over a year later, I'm thinking more here about performance and scalability. So this one's a keeper. If playing the blues has taught me anything, it's that we're all just riffin' on three chords, anyway!
New Album — Space Frog 64 🐸

Video Game inspired Drum and Bass! Influenced by Soichi Terada and Jun Chikuma.
Space Cowboy Forrest Frog pilots his galaxy F-5 aircraft in search of the Hyper Fragment — a now rare material used to power warp speed travel. A group called the Black Hole Herons has aggressively taken control over the mines in the Lake Lenticular Galaxy, and there's only one gunman for the job!
Purchase on 🤘 Bandcamp and listen on 🙉 Spotify or any of your favorite streaming services!
Pachabel - Canon in D
An oldie, but a goodie.
I'm really tempted to run this video through a green screen effect! We could launch this video INTO SPAAAACE!
American Football

Been listening to lots of American Football and Midwest Emo lately.
My favorite rendition of their music has to be this Super Mario 64 soundfont cover.
Also, playoff season babyyy!!
Setting Up OAuth and Email Providers for Next Authentication
Continuing the journey of setting up Authentication with Next.js! Last time I walked through the email/password approach. I'll touch on setting up OAuth and email link sign in, mostly looking at how to coordinate multiple sign in providers for single user accounts.
Provider Setup
Email and OAuth setup is fairly straightforward and is best done as outlined in the docs.
One exception: I'm going to flip on allowDangerousEmailAccountLinking in my email and OAuth provider settings
EmailProvider({
    server: process.env.EMAIL_SERVER,
    from: process.env.EMAIL_FROM,
    allowDangerousEmailAccountLinking: true,
Reason being: our users are likely to use OAuth logins for one instance, but then be required to use email for other cases. By default, Next Auth won't link those separate logins with the same account. Here, we're able to do so without getting an error on login. I'll walk through handling account creation for existing users below:
Traffic Control
Much of the magic for customizing our login will happen in the signIn() callback provided to our authOptions
callbacks: {
        signIn: async ({user, account}) => {...},
}
Here, we'll have access to the user provided by our db adapter or from the OAuth provider.
Inside, I'll have a try / catch block handling different login cases:
try {
    if(account?.provider === 'google') {
        ...
    } else if(account.provider === 'credentials') {
        ...
    } else if(account.provider === 'email') {
        ...
    }

} catch (e) {
    console.error(e);
}
I'll leave out explicit details for our particular application out, but I'll show how we're creating that account for OAuth login if the account does not already exist:
    if(!foundUser) {
        // User does not exist! Can't login
        return false;
    } else {
        // User exists! We can log the user in
        // Check if user account exists
        const existingAccount = await db.collection('accounts').findOne({
            ...query
        }, {
            projection: {_id: 1},
        });

        // If no account exists, create it
        if(!existingAccount) {
            const accountObject = {
                ...account,
                user: {
                    connect: {
                        email: user.email ?? '',
                    },
                },
                userId: foundUser._id,
            };

            const setRes = await db.collection('accounts').insertOne(accountObject);

            if(!setRes.insertedId) {
                throw new Error('Error saving new Google Provider Account into DB.');
            }
        }

        return true;
    }
So we've ensured next auth won't throw the error of an email already existing with another provider. Now, if the account doesn't already exist for this provider, we're ensuring there's not a lookup error by manually adding it ourselves.
Same logic works in the email provider flow.
From there, returning true signals to Next Auth that the user can sign in safely.
Blue Monk
Transcribing after Charlie Rouse
The Alchemist

Read Paulo Coelho's The Alchemist over winter break!